Friday, March 28, 2014

How To Curl Extra Long Hair

The Lord has blessed me and my girls with some long hair.  All three of us have really thick, full hair so taking the time to curl it isn't always an option. But when I do, I love the results. It just looks so pretty! (I usually just put our hair up in a bun or braids for the everyday style).  My first choice for curling such long glory is having them sleep in braids. Nothing new and exciting but I have a trick for the ends of the hair that you may have never heard of.

First, braid. 
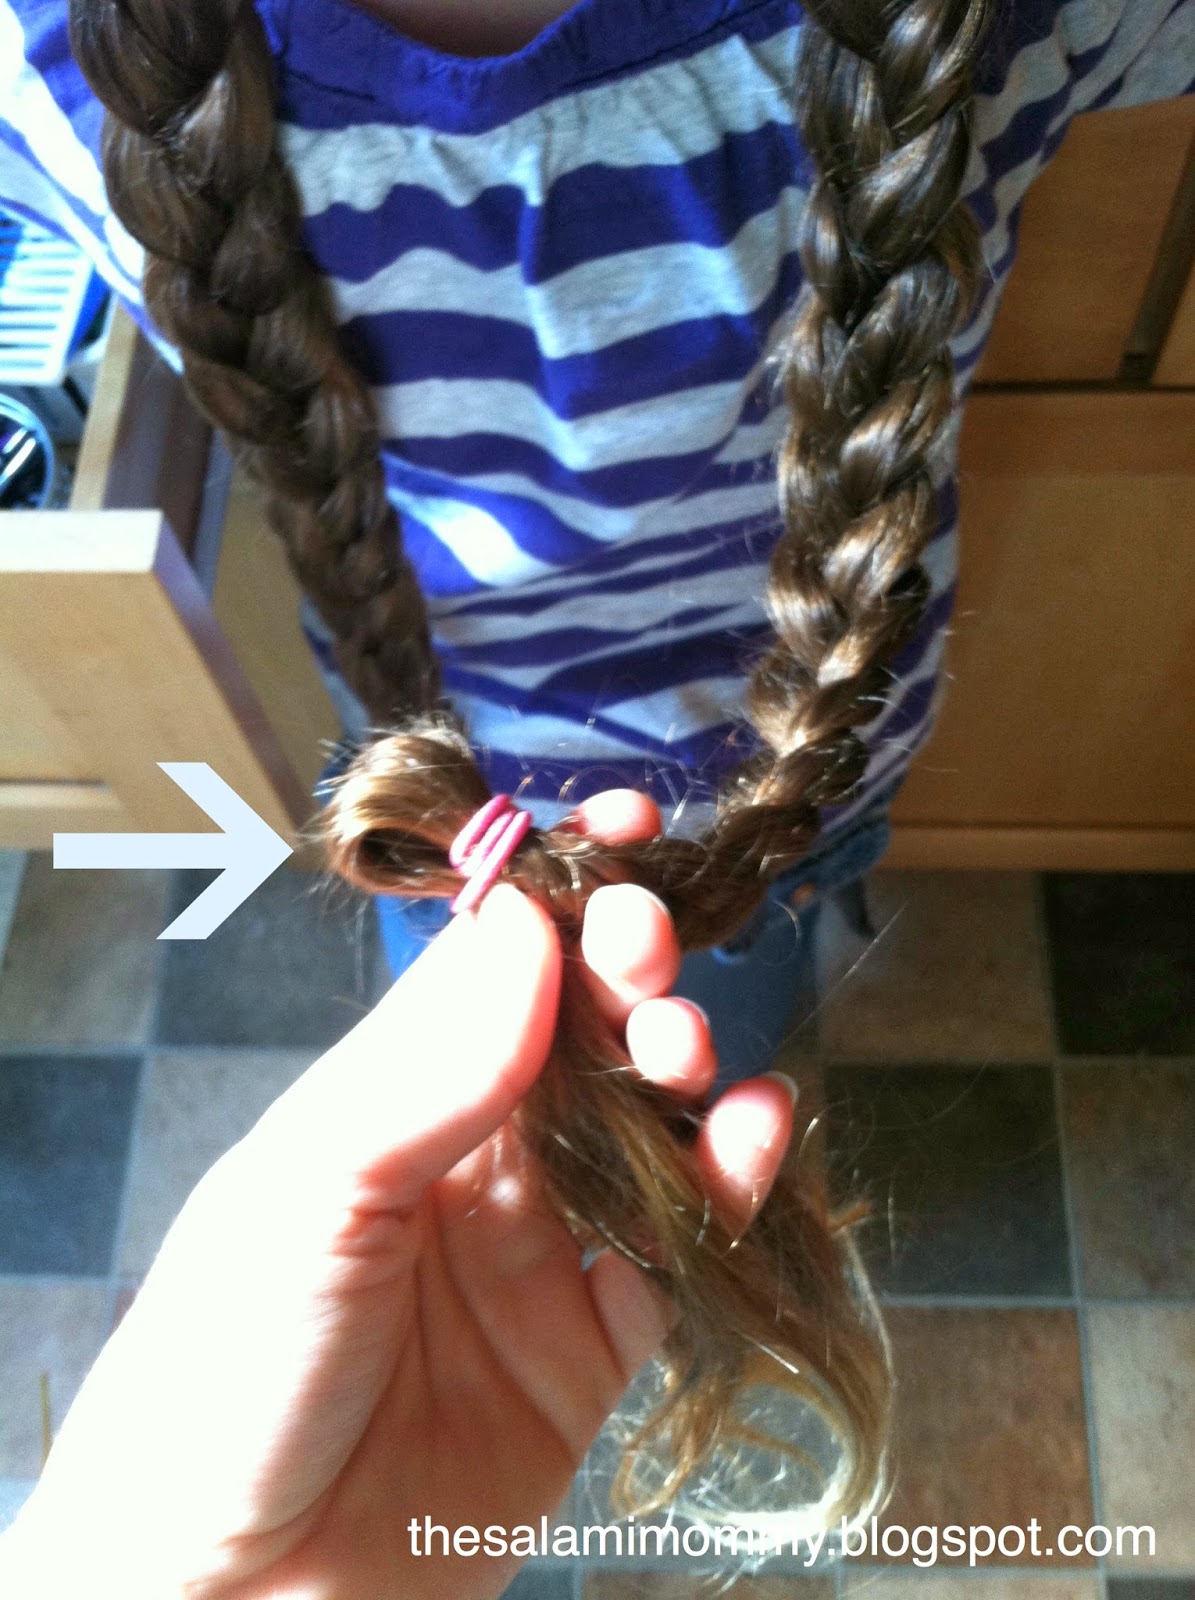
When you get to the ends wrap it once in a loop around the hair elastic. 


Now, wrap the  remaining ends around that loop and some of the braid, depending on how much hair you have left. 
 Secure it with another elastic or two.


Close up of hair wrapped around the bottom.


Now go to sleep and wake up in the morning.
This is what it will look like.
A mess.


Take out the elastics and braid.


The ends have a nice wavy curl to them. 


This is the easiest way to get loose, wavy curls without using any type of heat. 
The curls generally will stay all day, depending on how long you left the braid in. Keeping them in overnight is the what has worked best for us.

Have a blessed day!

Thursday, March 27, 2014

Thrifty Thursday {sentimental ceiling tile}

We have been battling sickness, car repairs, and a furnace going out, needless to say, I haven't been to Goodwill in a few weeks. But, while at my mom's I spotted something and have big plans for it.


It was really hard trying to get a good picture of these.  
They are old ceiling tiles from the building I grew up in. My mom saved some of the best tiles before a drop ceiling was put in over them.
 They hold some sentimental value for me. As a child and into my teenage years, I remember staring at these tiles at night before going to bed.  
My mom said I could paint them. Yippee! I am thinking white paint and a little distressing. We'll see.

Cost: Free 

Wednesday, March 19, 2014

A Simple Drawer Liner {for the Undecided}

I know it sounds silly, but what if you are afraid to lay down contact paper on a drawer and not like it 3 months from now?

A serious problem for this homemaker. ;) 

So I came up with the perfect solution for my undecidedness. (Just made up that word). 


To start off, if your drawers look like this.....


or this.....


which most of mine do....it's time for a makeover!

Here's what I did.

I bought some plain white poster board and found some pretty drawer liner paper. Everything I bought was under $5.


Measure the inside of your drawer. Cut the excess paper off. Measure the contact paper needed. Apply the contact paper on the poster board and voila!
It's not perfect, and this momma is ok with that. 

Place the finished product in the drawer.


Ahhhhh, so much better!


My pans even look brighter. ;)

The best part of this little project is that I can switch it out whenever I want, without worrying about how to get the super sticky contact paper off.

Happy Wednesday!

Tuesday, March 11, 2014

DIY curtains using a drop cloth

I've had these curtains up since we did the kitchen remodel a few years ago. I used a table cloth to make them. They held up fine. I'm  just ready for something new. 

   
I found some fabric online that i liked to make the curtains with only, it was well over the amount I wanted to pay. At the price for the fabric I might as well just buy new curtains. 
To make this more cost efficient it meant to get the most bang for my buck. 
Which means, using drop cloths. There is a ton of fabric in one package of drop cloth!
Drop cloth is heavy weight and paintable, obviously. ;) 
I needed something that will hold up because this door gets used the entire day. The only downside to using a drop cloth is that I have read that they are stiff when you hang them. Not a big deal to me.

First, I measured the sliding glass doors and got my measurements. 
I washed the drop cloth before I cut them. VERY important!!!! It will shrink if you don't!

Next, I laid out the drop cloth, measured, and cut.

(Princess Fluffy loves taking pictures.)

Then, I measured out the stripes on the drop cloth. I went with 10-inch stripes. This width worked perfectly with the length I had. I used Scotch Blue tape and had to press firmly for it to hold to the drop cloth.


Before I started painting, I laid out a large plastic table cloth to prevent any paint getting on the floor. Works perfectly!


Next, I rolled the paint on using a 4-inch roller that I had.
When painting a drop cloth, it will soak up A LOT of paint! I used an entire quart on this project, and barely made it.
The tape wasn't cooperating at all while I was painting, so I held it down when I painted near it. 

  
OK, I know this looks bad but it was night time and the paint was still wet. Stay with me. 
After I finished painting the stripes, my sidekick (little mister in above pic), took the tape off. I hung them over doors overnight because they were so long. And because I didn't want to have paw prints all over when I woke up in the morning. ;)


This is what they look like now.


Every picture I take makes the color look differently. 
Kind of annoying.


 The grey I used was leftover from a past project. 
They are a little stiff, but I really don't care.
However, if you are worried about the stiffness, you can add a fabric medium to the paint. This is also useful if you want to wash them. I usually just spot clean if anything gets on the curtains. 

Have a blessed day! 


Saturday, March 8, 2014

Snow days

Spring is coming. 
I know it is. 
Even if I look outside and still see snow. ;) 
So, in saying good bye to winter, enjoy some pictures from our snow days!


Thursday, March 6, 2014

Thrifty Thursday {dresser, nightstand, & books}

 I'm back with some super finds. 

We got rid of two dressers in our bedroom redo to open the space up. But since our closet space is very tiny, we needed one dresser to help us out. So I searched Craigslist for a few weeks. Found nothing. Then, on a trip to Goodwill I found this pretty thing.


                       Love at first sight.
When the weather gets warmer, I'll give it a new coat of paint. And cover up that random "R" on the second drawer.


There are some scratches that I hope I can remove.

Cost: $20


The next pieces came from my mom. 
I was actually with her when she bought these at a garage sale last summer. I wanted to buy them myself, but at the time had no where to put them. When we did the bedroom makeover, we were on the look out for matching nightstands. I completely forgot about these pieces until my mom mentioned them and told me to take them. Thanks Mom!!!


There is an identical one on the other side of our bed. They are narrow, but have surprisingly deep drawers, which help with our limited closet space.


I have some plans for these twins. 
Just as soon as it warms up, and quits snowing!

Cost: Free!


The next finds are from Goodwill. I went in looking for a jean jacket and came out with about 10 pounds of books! That's usually what happens at Goodwill. You never know what you will find! 
Anyway, I always browse the book section just to look. My kiddos love to read and books cost $.50 to $1.00 there! So, I think a church just unloaded a whole bunch of spiritual/biblical books before I arrived because there were a ton of them there. 
I ended up buying two really nice sets of children's bible stories. 


The day after I bought these, the girls had already read through half of the first set! 
I really like these bible story sets because they are based off the KJV. That's the version we use and the girls were easily able to follow along with the pictures. 

 Cost: $14 {each book was a $1} 

Happy Hunting!

Tuesday, March 4, 2014

Updo for long hair {tutorial}

One thing is certain. My girls have long hair. Let me rephrase that. My girls have EXTRA-long hair. When I say EXTRA, I mean past their little bottoms. So this hair tutorial involves a lot of hair. 
Side note: I have tried it on shorter (shoulder-length) and it didn't work as well.

Here we go:

First, grab a small chunk of hair in the front.


Second, divide the chunk of hair into two parts and start a french braid going down the side of the face.


Pictures 1 & 2, continue the french braid down, past the ear.
Picture 3 & 4, clip the braid in place, so you can grab the rest of the hair for the pony tail.
You could stop here, and it would look really cute.


Now, this is the part where I couldn't take a picture. So I will do my best to explain it. 
After all the hair is in a pony tail, I just start twisting around the base of the pony tail until just the ends are sticking out. Then, I secure the bun with 2 jaw clips.
I use jaw clips because our hair is so thick and long.  
If you have shorter hair you may be able to pin it up with no jaw clips. 


These are the hair accessories I need for this updo.


This may look confusing so I'll explain.
Pictures 1 & 2, I use the extra hair sticking out at the top, to cover the jaw clips. Take half of the hair and wrap it around one side. Pin the hair into the side of the bun after you have covered the jaw clip. Repeat for the other side.
Pictures 3 & 4, if there is any extra hair sticking out just pin it inside the bun.   


Sometimes I do not have enough hair to cover a jaw clip, so I pin a pretty hair clip to hide it. 


Here is the other side.


I do this hair style quite a bit. It may seen too fancy for an everyday style but with the hair God has given us, it works. 
There are so many different variations you could do with just this updo. Thankfully, I have two little girls that allow me to practice on them. :)

Have a blessed day!